Choose the best miter saw! Easier said than done! That’s why we’ve put together this guide to help you make the perfect cut, even if you are a beginner. We will keep it as concise as we can. It’s good to know that differences may not be wild between models, but knowing what to expect before shopping for a new miter saw is smart. A few extra minutes can mean the difference between a poor purchase that may slow down your home improvement or construction job.
Power
Power is probably the number one essential feature when grabbing a new saw. Without enough amperage or amps, your saw will not perform as needed. Ever had a saw bog down while trying to make what should be a basic cut? We have. That’s why keeping an eye on the motor’s power is key.
A good miter saw will have around 15 amps, dispensing an average blade speed of around 3,000 to 5,000 RPM. That’s a solid target number to look out for. Of course, you will see fine saws with more or less than that. Higher-powered miter saws can handle heavier saw blades that can be used for various materials that go well beyond wood.
Further, there is also the cordless miter saw. These battery-operated miter saws usually indicate their power capabilities by the volts and the number of cuts on a single battery charge. High-end miter saw models will offer around 200 – 300 cuts per charge.
Depth of Cut
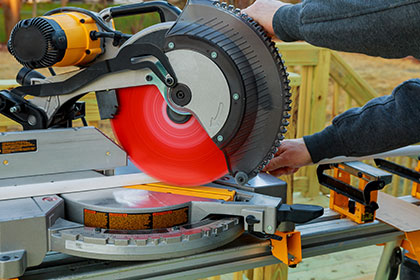
The depth of the cut should be considered. Each job is different, but you want a miter saw with enough depth options to last for many projects. The depth of cut offered will depend on the blade size, and as we know, blades diameters range from 7-1/4 inch and up to 15 inch and more.
A typical miter saw with a 10-inch blade can cut two by four with no problem. The 12-inch blade models can go about 3 to 4 inches, making them solid for four-by-four cuts. Just remember that the larger blade will make deeper cuts, while the smaller one will spin faster. It is a trade-off, but you’ll know what is best if you do some soul-searching about your job uses.
Generally, the bigger the blade, the longer the cut. In other words, bigger crosscuts, miter cuts, and bevel cuts. Also, the sliding miter saw’s gliding mechanism allows you to make bigger cuts regardless of the blade size. Below we will explain more about the different blade sizes. But to cut it short, if you plan to make deeper, wider cuts, go with a 12-inch miter saw. If not, a 10-inch miter saw is fine for various applications.
Though one advantage to the 10-inch blade miter saw is that you can swap its blades with your table saw blades. And same thing applies to the 7-1/4 inch blade miter saw as you can swap it with the blades of your circular saw.
Miter Range
Bevel and miter angles are of course, very important. One common thing is that they are all capable of cutting at 45°. You will find some with a 48° range and others with asymmetric ranges like 50° to the left and 60° to the right. First, you should determine the scale of your projects and then consider a saw that allows you enough flexibility according to your needs.
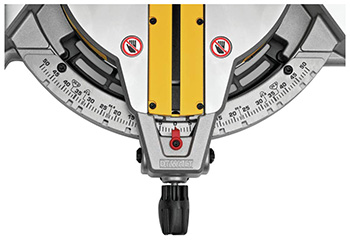
Miter cuts can only be done with the help of a miter scale. This scale is similar to a protractor mounted onto the miter saw frame. It is marked with measurements in degrees. To perform a miter cut, you guide the saw blade into the correct position and lock the miter handle. This handle allows you to rotate the entire saw assembly into the position of the desired angle.
Most miter saws will also come with positive stop detents. These are preset points of the scale’s most popular miter cut angles. They provide fast and easy access to the commonly used angles. A good miter saw will have at least positive stops at the most popular and common angles, which are 0°, 22.5°, and 45°.
Bevel Range
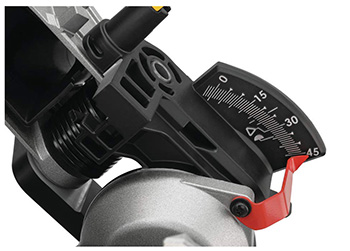
Like the miter scale, there is also a bevel scale and lock handle to help you perform a bevel cut. However, the bevel range is usually more limited than the miter range. Also it comes with fewer bevel detents; some models come with none. Noting that this scale is only available in compound miter saws.
A single bevel compound miter saw tilts to only one side (either left or right); in some designs they can tilt up towards 50°. While a double bevel compound miter saw tilts to both sides (left and right), so it will tilt to -50° and +50°. A good range is to have a saw that tilts to a minimum of 45° with at least three bevel stops. This will provide you with enough flexibility. In most cases, you won’t need more. Below we will explain more details about the bevel capacities.
Fencing
The fence on a miter saw helps improve control and accuracy for miter and bevel cuts. The fence is a wall-like structure usually made of polished aluminum and mounted on the edge of the throat depth of the cutting table. A good miter fence will offer different height settings to support stock of different sizes.
Precision
Making accurate, precise cuts is why you want a miter saw. Without complete accuracy, the saw is rendered inefficient. Look for models that boast high precision. Important accuracy options include LED/laser cut line indicators, work lights, strong materials, and proper construction.
All parts should be tight and flush. The bevel must remain at the angle that you set it. Always, always see what others are saying before pulling the trigger. Be sure your saw is well made if you want those precision cuts.
Blade, Blade Guard, & Blade Changes
A saw without a blade is no saw. That being said, next to the motor, the blade is the top feature of a miter saw. You want a good strong blade. For that, seek a model that uses only high-quality materials. Of course, blades can be swapped, so you can usually find a better blade if you don’t already have a good one.
Blade guards keep the blade guard when it is not being used. Upon squeezing the trigger, the blade guard will come up, and the sawing will begin. Once the trigger is released, the guard should conceal the blade once more. This is a much-needed safety feature.
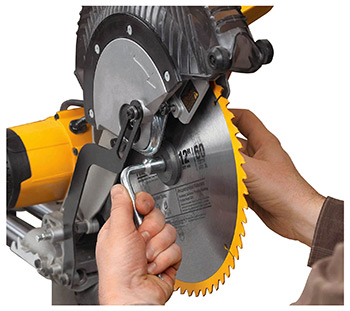
Changing a blade does not need to be a drastic effort. Most good miter saws make it easy. You usually loosen the screw near the blade guard, rotate the blade by hand, loosen some bolts, and voila. The blade is out. The process will change depending on the model, so always read the manual before doing this. And of course, keep the saw unplugged at all times during maintenance.
Further, most high-quality miter saws have an electric brake. This ensures that the blade ceases to spin when the trigger is not squeezed. This brings the spinning blade to a complete stop in less than 2 seconds. If safety is paramount (and it should be) get a miter saw that has a good electric brake.
Handle & Trigger
The handle is the part that gives you control over the head of the saw. The handle can be mounted horizontally or vertically. Some models even come with a handle that rotates to 90°.
This takes us to the trigger, an easy-to-pull trigger for the handle makes cutting easier. However, always keep in mind that when you release the trigger the blade will still spin momentarily. Don’t make any abrupt motions to move the blade or the wood. A good saw will not keep the blade going when the trigger is not held down. Safety should be a top priority!
Speaking of safety, if you ever feel your trigger getting hard or sticky, be sure to consider a repair or a replacement. Parts can typically be found; in almost all cases, it is wise to change the trigger in this situation. Do an overview of your tool occasionally to ensure it is up to speed.
Dust Collection
Dust ports are a nice feature to have on a miter saw. This is due to the high volume of saw dust that begins to collect as cuts are made. While not having a dust collector is not the end of the world, having one can keep your workspace cleaner and your air healthier.
Not all models will have a dust collector, though many will allow for the addition of an added dust bag accessory.
Accessories
As with most power tools, miter saws can be equipped with many aftermarket accessories. Some are included at purchase, while others must be found at your favorite woodworking tool spot. Common accessories include:
- Blades
- Dust bags
- Screws, bolts, washers
- Rolling stands
- Extension Tables
- Track clamps
- Mounts
As you can see, there is a wide world of miter saw accessories. There are more out there. They aren’t hard to find. If you need it, you will find it.